Archive for the ‘dieting’ Category

h1

Lemon tart

August 8, 2010

Lemon tart is one of my favourite desserts, but for some reason, one that I’ve never made myself. Why, when it’s so simple? Well, now I have made it, and it was delicious. And easy. Well, I used ready made pastry, sorry.
image

This was supposed to be low calorie, using low fat creme fraiche, but Mr Rice had trouble locating it on his shopping trip. So there were a few more calories than I’d originally intended. The full fat creme fraiche made it lovely and rich though.

Recipe for Lemon tart

250g sweet dessert pastry (Sainsbury’s is sweet and buttery)
200g creme fraiche
2 eggs
4 egg yolks
175g caster sugar
2 lemons, juice only
icing sugar for dusting
raspberries for decorating

Preheat the oven to 190°C and grease a 9 inch loose bottomed tart tin. Roll out the pastry and carefully drape it over your tin, and press it down into the tin, but don’t cut the edges off at this point. Prick the surface gently with a fork, fill with baking beans (or baking paper and rice) then chill it in the fridge for at least 20 minutes, or until you need it.

Bake the pastry blind for 15 minutes until it’s just getting a bit of colour, then remove the baking beans or paper and rice. Brush the pastry with the beaten egg yolk, and bake for another 10 minutes until the pastry’s golden. Let it cool for a bit. Now you can trim the edges as you like.

Turn the oven down to 110°C. Whisk up the eggs, egg yolks and sugar, then stir in the creme fraiche, and finally the lemon juice. Transfer it into a jug so it’s easy to get into the tin.

Put the tin onto the oven shelf and pull it so you’ve got enough pouring room, then pour your mixture slowly into the tin, slide it back into the oven and cook for 1 hour 10 minutes. Check the centre is a little wobbly, and it’s ready.

Leave to cool, dust with icing sugar, scatter with a few fresh raspberries and serve. For extra decadence, drizzle with some single cream. Yum.

© Katheryn Rice 2010

h1

Blackberry and apple muffins

May 18, 2008

blackberry and apple

Muffins have been on my list of things to cook for a while, particularly as I have muffins in mind as a quick and tasty alternative to toast for breakfast in the morning. Many a time I have pictured myself grabbing a frozen muffin or two from the freezer as I run out of the door to work. I finally had a spare afternoon and managed to dig out the muffin recipe I had been saving for this very day. To top it all, I had also invested in some silicon muffin cases, mini and normal sized, so I really was all set to go…

Blackberry and apple is one of my favourite combinations, which harks back to my childhood and many memorable sunday teatimes eating blackberry and apple crumble. So I thought I would transfer this combination to muffins. And to make myself feel better that I was planning to eat these for my breakfasts, I thought I should inject some healthiness in the form of brown flour and oats, to up the protein and lower the glycaemic load. Luckily the combination works very well and they are delicious!

Recipe for blackberry and apple muffins
Dry ingredients
140g soft brown sugar
150g brown self-raising flour
100g rolled oats, blended until powdery
1 tsp bicarbonate of soda
Wet ingredients
85g butter, melted and just cooled
2 large eggs
200ml milk
1 tsp vanilla extract
Filling
150g blackberries
1 eating apple, finely chopped

If you have silicon muffin cases, lay them out in muffin tins (this helps to keep their shape), or just place them close together on a baking tray. I used 12 mini muffin cases and 12 normal sized cases, and also needed to use a silicon muffin tray too. Preheat the oven to 200ºC.

Combine all the dry ingredients in a bowl, then mix all the wet ingredients in a jug, making sure they are well combined. Then pour the wet into the dry and carefully fold in. When it’s about half combined, add the fruit chunks and continue to fold carefully until just combined. You have to be careful not to over-mix or this will make your muffins tough and flat – not so much fun than light and fluffy ones!

Spoon the mixture into all your muffin cases and tins and cook in the oven for 15-20 minutes. They are ready when golden brown and springy to the touch. Let cool for a bit and then remove from the cases. If you want to freeze them, let them cool completely, then wrap individually in cling film and put in the freezer in a sealed freezer bag.

Tip: If you want to make them more fluffy and less health-conscious, substitute the brown flour and oats for all white flour. 

© Katheryn Rice 2008 

h1

Warm salad Nicoise with tuna steak

March 2, 2008

It’s sometimes quick and easy to make yourself a tuna Nicoise with tinned tuna, and often a half decent meal out will even offer the same, but the best kind of tuna Nicoise involves fresh, meaty tuna, preferably from a renewable source.*

Mr Rice loves his Nicoise salads, so I thought it only fair to treat him to a special version to remind him how much I appreciate his husband skills. This recipe is based on Simon Rimmer’s version – the dressing and vegetables are warm, as well as the freshly griddled tuna, so it’s perfect for a chilly day.

tuna-nicoise-2.jpg

Recipe for warm salad Nicoise with tuna steak
100g green beans
100g new potatoes
12 cherry tomatoes
2 eggs
2 fresh tuna steaks
1 tbsp olive oil
Dressing
1 tbsp Dijon mustard
30ml white wine vinegar
150ml olive oil
juice of 1 lemon
salt and pepper

Scrub the new potatoes and halve if necessary, to make them all bite-size, then put them on to boil for about ten minutes. Put the two eggs onto boil for ten minutes.Then trim the green beans and steam for 7-8 minutes. Meanwhile, for the dressing, whisk together the mustard, vinegar, olive oil, lemon juice, salt and pepper.

When the dressing is mixed, transfer it to a frying pan and warm over a low heat. Drain the potatoes and them, the steamed beans, potatoes and tomatoes and toss them in the warm dressing. Remove from the heat.

tuna-nicoise-1.jpg

Brush the tuna steaks with a little olive oil and season with salt and pepper. Cook the tuna steaks on a hot griddle pan for about 30 seconds on each side. To serve, pile up the dressed vegetables and place the tuna steak on top, with the halved hard boiled egg on the side.

*The salad can also work with tinned tuna. Just drain it and add to the vegetables and dressing at the last minute. 

© Katheryn Rice 2008

h1

Mikki’s Apple Creme Caramel

February 17, 2008

This is a bit of a departure for me – blogging about someone else’s cooking, but when my sister Mikki sent me the picture and recipe for Apple Creme Caramel I thought I had to share it.

applecremecaramel.jpg

Mikki wrote, “I made this yesterday for Valentines, and I’m pretty sure its the best pudding I’ve ever made! Really! It’s so light and fresh, and only 200 calories! The apple gives it a lovely zing that is offset by the custard. The recipe sounds a bit odd, and I was sceptical to start with, but I made it anyway and it really works.”

Recipe for Apple Creme Caramel – serves 6

Caramel:
750ml clear apple juice
pinch of ground cinnamon
3tsp sugar

Custard:
3 eggs
3 egg yolks
2oz sugar
500ml clear apple juice

Garnish:
10oz blackberries

Preheat the oven to 160C

To make the caramel put the apple juice in a large, heavy pan with the cinnamon. Bring to the boil, then cook over a high heat for about 20mins or until reduced by half. Lower the heat to moderate, add the sugar and continue boiling down for a further 10mins or until thickened to a bubbling darkish syrup. Take care, as it burns very easily at this stage. The syrup will thicken as it cools, so don’t reduce it too much.
Remove from the heat and pour in to 6 ramekins (150ml / 5floz capacity). Swirl the apple caramel round the sides, or use a spoon and spread it around a bit. Make sure to keep some of the caramel to serve.

For the custard beat the eggs and egg yolks with the sugar until smooth. Heat the apple juice in a pan until it comes to the boil, then slowly stir in to the egg mixture, mixing well (this works honestly – it looks like it’s curdled, but it turns out fine). Pour the custard in to the caramel lined ramekins.

Set the ramekins in a roasting tin. Pour hot water in to the tin to come about halfway up the ramekins. Bake for 35-40 mins or until the custard has just set (mine took 45 to go golden on top). Remove the ramekins from the tin, leave to cool then chill for at least 2 hours.

To serve loosen each custard with a knife run round the edge, then turn out on to a plate (hold the plate on top of the ramekin then flip it over) where it will be surrounded by it’s own pool of apple caramel sauce. Serve with a drizzle of the thicker caramel and blackberries.

© Katheryn Rice 2008

h1

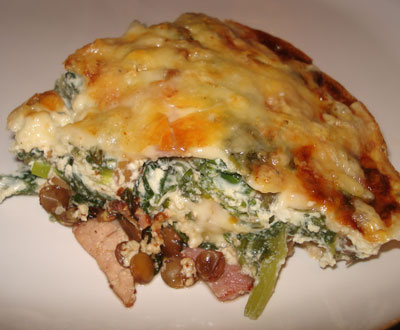
Spinach, bacon and lentil omelette

December 4, 2007

Sometimes, I find myself walking from fridge to cupboard to vegetable basket, having a look and then doing the rounds again, hoping for inspiration. As long as I have eggs, milk and maybe a bit of cheese, then I know whatever I’ve got in the cupboards can be combined into an omelette.

spinach-bacon-omelette-3.jpg

Recipe for spinach, bacon and lentil omelette
1 medium onion
3 rashers smoked bacon
100g spinach
2 garlic cloves
1 can green lentils
2 eggs
100ml milk
100g cheddar cheese

Finely chop the bacon and fry until just cooked – you don’t need oil, as enough fat will come out. Then add the finely chopped onions and cook until soft, then add the chopped spinach and cook down until it’s reduced. Drain any excess water from the pan, then add the well-drained lentils. Cook together for a few minutes, and add salt and pepper to taste.

spinach-bacon-omelette-2.jpg

Gently beat the eggs with the milk and a little seasoning, then add half the grated cheese and combine well. Pour this mixture carefully over the mixture in the pan and cook on a low heat for 5-7 minutes. Then heat up the grill and cook for another 5 minutes. Sprinkle the rest of the cheese on top and grill until it’s well browned.

The omelette should slide easily out of the pan. Slice into wedges and serve with a crunchy green salad.

spinach-bacon-omelette-1.jpg

©  Katheryn Rice 2007

h1

Healthy Fish and Chips

November 14, 2007

fish-and-chips.jpg 

I love fish and chips but these days it feels so unhealthy to eat a whole battered, deep fried fish. In any case, I prefer to make it myself at home, because I know what’s going into it, and of course for the fun of it too.

This is a really delicious version of fish and chips that you can make yourself, safe in the knowledge that it is reasonably healthy. I made this for the other Mrs Rice, my gorgeous sister-in-law when she came over one evening and we had a lovely, chilled out time, free from the Rice brothers’ showing off.

Recipe for Health Fish and Chips
2 fish fillets (I used plaice, but choose whichever fish you like)
1 egg
100g breadcrumbs
1 tsp paprika (smoked or plain)
¼ tsp cayenne pepper
1 tsp lemon zest
1 tsp sea salt
¼ tsp black pepper
50g wholemeal flour
100g wholemeal breadcrumbs
50g butter
2 potatoes

Preheat the oven to 200ºC and line 2 baking trays with foil, and a tiny bit of oil. Wash the potatoes thoroughly and cut into wedges. Separate the eggs and put the yolks to one side. Whisk up the eggs whites until they are light and fluffy, then quickly toss the potatoes in the eggs until they are all covered and pour it all onto one of the baking trays and put it into the oven immediately. This is a trick a friend told me about that I thought sounded barmy, but it really helps to give the chips a crunchy coating without having to deep fry them. They will take about an hour to cook, and make sure you turn them at least twice during this time to get the best coating.

chips.jpg

The fish takes about 7-10 minutes to cook, so when you think the chips have about 20 minutes to go, start preparing the fish. Gently beat the egg yolks and pour onto a medium-sized plate. Put the flour onto another plate, and mix the breadcrumbs, spices, seasoning and zest together and the stir in the melted butter.

Arrange them in this order: flour, egg, breadcrumbs. Take each piece of fish and coat the flesh side with flour, then the egg, then the breadcrumb mixture, and place it skin side down onto the baking tray. Cook for 7-10 minutes, until the breadcrumbs are crispy and golden.

fish-and-chips-2.jpg

© Katheryn Rice 2007

h1

Coconut Yoghurt Eton Mess

November 4, 2007

It’s amazing what you can do with storecupboard ingredients when you’ve got a real craving for something sweet. It definitely brings out my creative side. Maybe I’m making a virtue of necessity, but it doesn’t matter because I’ve discovered a wicked, reasonably low fat pudding, and of course it’s super-easy to make.

coconut-eton-mess.jpg

Recipe for Coconut Yoghurt Eton Mess
2 meringues
5 tbsps coconut yoghurt
a sprinkling of chocolate coated seeds

Put one of the meringues into a bowl. Spoon the yoghurt into another bowl and crumble the meringues into it. Combine the mixture, then pile it on top of the first meringue and then sprinkle the chocolate seeds on top and eat. It might remind you of a certain exotic chocolate bar.

©Katheryn Rice 2007

h1

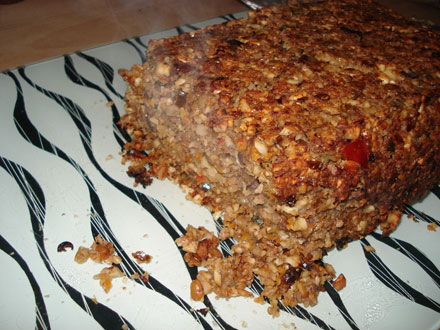
Vegetable Nut Roast

September 26, 2007
veg-nut-roast-5.jpg
Vegetable nut roast

When I was trying to come up with a nut roast recipe, this was the other on my shortlist. It has a much higher nut content than the cheese and tomato version. This also makes it more crumbly, but also gives it more of a crunch, and a definite nuttiness!

Recipe for vegetable nut roast
600g mixed nuts: peanuts, cashew nuts, hazelnuts, walnuts
100g mixed seeds: pumpkin seeds, sunflower seeds, flax seeds
225g tin of green lentils
1 medium aubergine
2 sticks celery
1 medium carrot
1 medium courgette
1 onion
2 cloves garlic
100g brown bread crumbs
1 egg
2 tsp oregano
1 tsp thyme
1 tsp marjoram
1 tsp paprika
2 tbsp soy sauce
2 tablespoons mango chutney
50g cheddar cheese
salt and pepper

First, put half the nuts in a blender and whizz until they are in fine, 1mm chunks, then whizz the other half until they are a little finer and put into a large mixing bowl.
veg-nut-roast-1.jpg

Finely chop the onions and garlic, then gently fry them in a large frying pan. Chop the aubergine into 1cm cubes and add to the pan with the herbs, spices and seasoning and cook until soft.

veg-nut-roast-2.jpg

Meanwhile grate the carrots, celery and courgette and then add to the pan and cook together for about 10 minutes.

veg-nut-roast-3.jpg

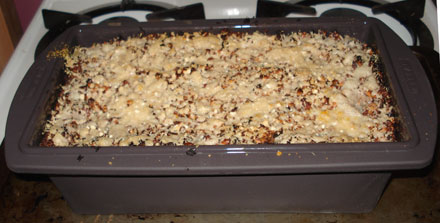
Stir in the soy sauce, mango chutney and egg and then add the drained lentils, nuts and breadcrumbs and mix it all together evenly. Then transfer it all to a large silicon loaf tin, top with the grated cheese and cook at 190°C for 45 minutes.

veg-nut-roast-4.jpg

When it’s cooked, let it cool for a couple of minutes, then carefully turn out onto a chopping board, where it can be sliced to serve.

Tips:
– If all the grating and chopping is a pain, you can cheat by chopping it in a food blender – it saves load of time. The end result will be smaller pieces than if you had grated it, but that really doesn’t matter in the finished nut roast.

– If you or any of your diners think nut roast as a main course is not manly enough, it can also be served as a delicious side dish with pork or chicken, or any other meal you fancy putting it with (this made it much more palatable for Mr Rice).

– This nut roast freezes really well. Just cut the slices to the size you want, then wrap carefully and tightly in cling film. Re-heat it in the microwave with some extra grated cheese instead of cheese on toast!

© Katheryn Rice 2007

h1

Mr Rice’s Halloumi and Chorizo Sandwiches

September 1, 2007

halloumi-chorizo-lettuce.jpg

Mr Rice is getting into the high protein, lower carb way of eating, and he cleverly used this as a basis for these no bread, high-protein sandwiches.

Halloumi and Chorizo both have very strong flavours, but rather than clashing, they go very well. The salty, chewy cheese really teams up well with the tangy, chewy meat. I think what makes it works so well is that the flavours are equally sttrong, so rather than one dominate the other, they both get their message across. The houmous underneath smoothens everything out, and it’s all wrapped up in a crispy lettuce leaf. Maximum protein and minimum carbohydrate.

Recipe for Mr Rice’s Halloumi and Chorizo Sandwiches
½ pack of Halloumi Cheese
8 slices of Chorizo
4 crisp lettuce leaves
½ tub of houmous

Slice the halloumi into cm thick portions and cook on both sides under a medium grill. Grill or fry the chorizo slices. Assemble as follows: lettuce, houmous, chorizo, halloumi.

Fold the lettuce around the topping and tuck in.

© Katheryn Rice 2007

h1

Courgette & Ginger Muffins

August 18, 2007

These weird-sounding cakes give you the feeling you are eating something pretty healthy whilst still tasting lovely. My initial reason for making them was thatI had too many courgettes, thanks to a bumper Abel & Cole delivery. And again, the organic grocers have come up trumps with a really original recipe, which I have adapted here, to include more protein and slow-burning carbohydrates. Courgette is not an obvious cake ingredient, but it adds a really light taste, lots of moisture and a soft little crunch.

courgette-muffins.jpg

Recipe for Courgette and Ginger Muffins
50g wholemeal plain flour
150g ground almonds
1 tsp grated fresh ginger
1 tsp ground cinnamon
1 tsp salt
1 tsp bicarbonate of soda
½ tsp baking powder
2 medium courgettes, grated
120ml vegetable oil
240ml honey
2 eggs, beaten
ginger syrup
zest of one orange
100g stem ginger
2 tbsp pumpkin seeds
2 tbsp sunflower seeds
2 tbsp linseeds

Icing
200g cream cheese
3 tbsp unsalted butter
50g icing sugar

In a medium sized bowl mix together the flour, ground almonds, fresh ginger, cinnamon, salt, bicarbonate of soda and baking powder. In larger bowl, combine the vegetable oil, honey, eggs and ginger syrup and stir thoroughly until combined, then add the courgettes and mix well. In a third, smaller bowl mix the orange zest, chopped stem ginger and all the seeds until everything is equally distributed. Then add this lot to the courgette mixture, and finally add the flour mixture. Stir carefully until all properly combined, and transfer straight to your cooking tins. These quantities make a fair amount of mixture, and it’s up to you what kind of tins you use. I use a combination of large and small muffin tins, and a flat tray-bake style tin as well.

Cook in the oven at 180C for 20-25 minutes, until golden and a tester comes out clean. Leave to cool for a while before removing them from the tins to a cooling rack.

Whilst the muffins are cooking, make the icing. Mix all the ingredients together, using an electric whisk, until the mixture is pale and fluffy, then cool in the fridge until needed. Smooth the icing generously over the muffins and chill in the fridge. They are lovely and moist, so will not dry out in the fridge. They also freeze really well.

© Katheryn Rice 2007