Archive for the ‘vegetarian food’ Category

h1

Perfect flapjack

October 5, 2012

20121005-120813.jpg

Fabulous flapjack

Since the dawn of my baking career I have dreamt of and strived to make the perfect flapjack. My criteria:

Good
Chewy
Sticky
Toffee-y

Bad
Dry
Crumbly
Rock hard

In the past, I have always achieved a toffee flavour, but also at least one element of the bad list every time. I have experimented with different recipes, different methods and different cooking times.

It’s the rock hardness that’s frustrated me the most. For a reasonably experienced baker, this is simply not good enough.

I needed something quick and easy to bake at 9pm to take into work the next morning for the Macmillan World’s Biggest Coffee Morning (such a worthwhile charity, close to the Rice hearts for what they did for Mr Rice senior). I turned to Lorraine Pascale’s recipe. I’d used this one before, and the finished flapjacks had the most delectable toffee flavour, but once cooled, they were solid as a rock.

Since then I’d had a very useful chat with a serious flapjack maker, Barbara. She uses the same recipe, but with one crucial change, which I’ll come to in a bit.

It worked!

Remember to take your time. It’s a simple recipe, but it will be game over if you rush it.

Recipe for perfect flapjack

175g butter
175g golden syrup
175g soft dark brown sugar
Pinch of ground ginger
Pinch of salt
350g oats (normal or gluten free)

Preheat the oven to 150°C and line a 23cm x 23cm tin with foil-backed parchment (or normal parchment). Slowly melt the butter in a large pan, then add the syrup and melt together slowly, stirring all the time. Then add the sugar, and melt it slowly and completely, so the mixture is smooth. Continue to stir on the heat very gently for another 3 or four minutes. Don’t let it boil, whatever you do. Test a bit on a teaspoon, but cool it first, or you’ll do some serious damage to your mouth. The mixture should have a subtle toffee flavour. Now take it off the heat and add all the oats, salt and ground ginger, stirring until it’s all combined and all oats are covered nicely.

Press it into the tin and cook for 30 minutes. This is the crucial bit. LP says do it for 40, but this has always yielded flapjack bricks.

So, take 10 minutes off the cooking time and do them for 30 minutes only.

Remove from the oven and leave to cool for 10 minutes. Then use the parchment to lift them out of the tin and slice as big or small as you like.

© Katheryn Rice 2012

h1

Cheesy sweet potato cakes

July 18, 2010

image

Perfect for light Sunday lunch, and a great way to use up last night’s sweet potato mash.

h1

Swede, kale and potato cakes

March 10, 2008

In Mr Rice’s absence I found myself with a vegetable surplus. I made soup with the leeks and potatoes, and pasta sauce with the peppers and tomatoes, but I was still left with kale, an onion, some small potatoes and a swede. I toyed with the idea of more soup, but we now have something of a soup mountain in the freezer so I decided to think more creatively.I used to love potato cakes when I was a child – made from leftover mashed potato with a little flour added and fried, then slathered in butter – the ultimate comfort food. So, on a gloomy sunday afternoon I decided to recreate this with the vegetables I had left. It worked really well, although it took a while, the final result was exactly what I had hoped for. 

swede-potato-cakes.jpg Recipe for Swede, kale and potato cakes

500g potatoes
1 swede
1 medium onion
2 tbsps golden caster sugar
4 kale sprigs
1 egg yolk
100g hard cheese, grated
25g butter
splash of olive oil
2 pinches of sea salt
25g wholemeal flour

Wash or peel the potatoes (I don’t peel potatoes much these days, I like to keep the fibre of the skins), then peel the swede and slice into chip-size pieces and steam for 20-25 minutes, or until they are soft and come apart easily in your fingers.

potato-and-swede.jpg

Meanwhile, heat up half the butter and a splash of olive oil in a frying pan and dice the onions, then slowly fry them until soft and translucent. Then add the sugar and stir well, then turn the heat down and cover, to let them caramelise. About five minutes before the potatoes and swede are cooked put the kale on to steam and remove the cover from the onions. It’s important that the onions are caramelised but don’t have any excess moisture as this will cause the cakes to be less firm, and therefore more difficult to fry.

potato-swede-kale.jpg

When the potatoes and swede are cooked, drain them well and heat them up in a pan to get rid of any excess moisture. Start to mash them and then add the onions and the steamed, drained and chopped kale. Mash and combine the mixture well, then add salt and pepper to your taste, remove from the heat and add the grated cheese, and finally the egg yolk.

swede-potato-mix.jpg

Dust your hands with a bit of the flour then shape the mixture into 8-10 cakes, put them on a plate and then chill in the fridge for at least 30 minutes.

uncooked-potato-cakes.jpg

Then heat the remaining butter and another splash of olive oil and gently fry the cakes until browned on both sides. Be very careful when turning them over as they can be fragile!

Serve immediately with salad and houmous.

Make sure you when you fry the cakes that you leave plenty of space in the pan so you can turn them easily.

© Katheryn Rice 2008

h1

Parsnip and leek soup

February 26, 2008

parsnip-and-leek-soup.jpg

One of the things I love most about Abel & Cole is the way their weekly selection of vegetables encourages me to be more creative with my cooking. One of my winter back-up recipes is potato and leek soup, because it is hearty, tasty and filling.

So, it was a cold, miserable sunday afternoon. Amongst my vegetable selection were some chunky leeks, but no potatoes. Plenty of parsnips though, so the idea for parsnip and leek soup was born.

Parsnips can be a little sweet, but the leeks and vegetable stock help to keep this at bay, and adding creme fraiche at the end smoothes it all over perfectly!

Recipe for Parsnip and leek soup
3 parsnips
2 large leeks
Knob of butter
Olive oil
500ml vegetable stock
Bay leaf
2 cloves of garlic
250ml milk
4 tbsps crème fraiche

Heat a dash of olive oil and the knob of butter in a large, lidded, heavy-bottomed pan. Wash the leeks and slice thinly then add to the pan when the fat starts to bubble. Stir thoroughly until the leeks are covered and then cook on a medium heat until the leeks are soft and translucent, then crush and add the garlic and cook for five more minutes.

 Meanwhile, peel and slice the parsnips, then add to the leeks and garlic, stir to combine well, then cover and sweat for 10 minutes, stirring once or twice to prevent it sticking to the bottom of the pan.

After 10 minutes the parsnips should be soft. Turn the heat up a little and add the stock and bay leaf, plus salt and pepper, then cover and leave to simmer for 30-40 minutes, until it has a soft and mushy consistency. Remove the bay leaf, then add the milk, stir to combine then remove from the heat. Then blend the soup with a hand blender until smooth, return to the heat, and finally, add the creme fraiche for a special creamy finish.

Serve immediately with crusty bread and a bit of grated cheddar. The soup can also be frozen in separate portions. It can be reheated in the microwave, but it’s  best heated up in a pan with a little milk.

h1

French toast

February 6, 2008

paradise-french-toast.jpg

Not strictly Thai food, but French toast Thai-style is delicious, cooked in the traditional way, and all the better for being served in a restaurant right on the beach, with hot sun shining down from a blue sky, and the waves of the Andaman Sea lapping gently on the shore. This was one of my favourite breakfasts while we stayed on Koh Lanta.

Served with honey on the side, these slices of bread are dipped in beaten egg and then fried until golden, so the inside is soft and the outside is crunchy. Try it with tomato ketchup or marmite for a savoury version.

© Katheryn Rice 2008

h1

Caramelised onions

December 20, 2007

Caramelised onions is one of my favourite ingredients. I love caramel at any time, and onions are the basis for so many dishes, however they have been prepared. That’s why I added them to my sausage rolls. Of course you can buy them in a jar, but making them usually gives better results.

Recipe for Caramelised Onions
3 red onions
1 white onion
25g butter
dash of olive oil
3 tbsps brown sugar
50 ml warm water
1 tsp balsamic vinegar

Thinly slice the onions and fry gently with the butter and olive oil until they are soft and translucent. It’s very important to let them cook slowly – if they burn the bitterness will come out, which will spoil the sweetness.

caramelised-onions-1.jpg

When the onions are soft and translucent and just starting to brown, add the brown sugar, balsamic vinegar and a splash of water and stir well. Then cover the pan and cook on a low heat for 15 minutes, stirring once or twice only, to ensure it doesn’t stick.

caramelised-onions-3.jpg

After 15 minutes, check the onions to see how much moisture is left. The less moisture there is, the sweeter and stronger the caramel flavour will be. Cook the onions in the same way – on a low heat with the lid on – until you get the consitency you want. For the sausage rolls recipe you will need the least amount of moisture, so they look like the onions below.

caramelised-onions-2.jpg

When the onions are caramelised to your liking, use immediately or store in the fridge for up to a week.

h1

Egg, mayonnaise & cress sandwich

November 30, 2007

The humble egg sandwich. It is often remembered less than fondly as the nightmare packed lunch on school trips. Some poor little blighter’s mum had packed them the smelliest, most pungent egg butties, and no sooner than was one corner of the unfortunate lunch lifted box would the cry go up ‘Aaarrrrgghhhh! Who’s got egg?!’

But there is a lot more to an egg sandwich than grey hard boiled eggs, mixed with cheap mayonnaise and slathered onto white sliced bread. The ingredients by themselves all the have the potential to be delicious or dire – it really depends what you use.

egg-cress-sandwich-3.jpg

Recipe for the perfect egg, mayonnaise and cress sandwich
2 slices seeded batch wholemeal bread (Sainsbury’s Taste the Difference is used here)
2 free range, organic eggs
3 tbsp French mayonnaise
organic cress
salt & pepper to taste
organic butter (optional)

Boil the eggs for 10 minutes, then remove from the water and run under cold water – this prevents them from continuing to cook and from the yolks from turning grey. When they are cool, peel and slice them in two directions in an egg slicer, to give you thin strips. Add them to a small bowl with the mayonnaise, salt and pepper and carefully fold until all is combined.

Butter the two slices of bread if you wish, then carefully spread the mixture onto one slice. Top this with carefully chopped cress, which might need pressing down gently.

egg-cress-sandwich-2.jpg

Then spread another layer of egg on the other slice, and then sandwich both slices together.

egg-cress-sandwich-1.jpg

Cut diagonally and serve immediately.

egg-cress-sandwich.jpg

I use French mayonnaise because it has a stronger flavour that really brings out the flavour of the eggs. The cress also adds a tangy dimension of its own. The bread is not just there to hold it all together – if you choose a really good quality, brown seedy loaf it will bring all the other flavours together too.

©  Katheryn Rice 2007

h1

Banana and chocolate chip cakes

November 27, 2007

I was in a bit of a quandry about how to approach this recipe. There are quite a few healthy cake recipes on She Likes Her Food, such as courgette and ginger muffins and healthy chocolate brownies. So, do I add to that collection or go the way of the sticky ginger cake instead? I decided to meet in the middle. Brown flour (good), ground seeds (good), bananas (quite good) and chocolate chips (not so good). There are definitely enough good ingredients in these cakes for you enjoy them without feeling too guilty.

banana-choc-cake.jpg

Recipe for Banana and chocolate chip cakes
50g wholemeal plain flour
150g ground almonds
3 medium bananas, mashed*
120ml vegetable oil
240ml honey
2 eggs, beaten
100g white chocolate drops
10g dark chocolate drops
2 tbsp pumpkin seeds
2 tbsp sunflower seeds
2 tbsp linseeds
½ tsp ground cinnamon
1 tsp salt
1 tsp bicarbonate of soda
½ tsp baking powder

Icing
200g cream cheese
1 banana, mashed
50g icing sugar

Grind the seeds together to a chunky consistency in a spice grinder or food blender. In a medium sized bowl mix together the seeds, flour, ground almonds, cinnamon, salt, bicarbonate of soda and baking powder. In larger bowl, combine the vegetable oil, honey and eggs and stir thoroughly until combined, then add the mashed bananas and mix well, then add to the flour mixture. Stir carefully until everything is properly combined, and transfer straight to your cooking tins. These quantities make a fair amount of mixture, and it’s up to you what kind of tins you use. I use a combination of large and small muffin tins, and a flat tray-bake style tin as well.

banana-choc-chip-1.jpg

Cook in the oven at 180C for 20-25 minutes, until golden and a tester comes out clean. Leave to cool for a while before removing them from the tins to a cooling rack.

Whilst the muffins are cooking, make the icing. Mix all the ingredients together, using an electric whisk, until the mixture is pale and fluffy, then cool in the fridge until needed. Smooth the icing generously over the muffins and chill until the icing is set. They are lovely and moist, so will not dry out in the fridge or freezer, in fact the cakes actually end up even more moist if they have been frozen.

* You can freeze bananas if you have a surplus, and frozen bananas work really well in this recipe. When frozen the skins go dark brown, but the flesh retains its pale yellow colour. They need about 30 minutes to defrost, and when you peel them you will find soft, glossy flesh that is slightly mushy and allows very easy mashing. You never have to let bananas go brown again – just freeze them! Read more about freezing bananas.

© Katheryn Rice 2007

h1

Potato and Kale Soup

November 18, 2007

Another interesting vegetable came from Abel & Cole this week: Kale.

kale.jpg

Soup’s a real comfort on a cold day, and making on a chilly afternoon is soothing and satisfying. I’ve made potato and leek soup many times, so what’s to stop it working with kale?

Mr Rice can be a little suspicious of my vegetable soups, but he loved this one as much as me, and I think it’s the best soup I’ve made.

kale-potato-soup-2.jpg

Recipe for Potato and Kale Soup
3 medium potatoes
300g kale
1 stick of celery
½ onion
500 ml vegetable stock
1 bay leaf
3 tbsp creme fraiche
1 pint of milk

Heat a dash of olive oil and a knob of butter in a large pan, then finely chop the onion and add to the pan, cooking until the onions are turning translucent, then finely chop the garlic and cook with the onions for a few minutes. Chop the celery into thin slices and add to the pan, and cook for another five minutes. Meanwhile, scrub the potatoes (peeling is optional) and cut into 5mm slices, then add these to the pan, stir it all together, then cover and cook for ten minutes.

Roughly chop the kale and add this and the bay leaf to the rest of the ingredients. Give it a good stir, then cover for five minutes, then add the stock, bring to the boil, and cover and cook for 40 minutes.

kale-potato-soup-1.jpg

Once everything has softened, remove the bay leaf, add the creme fraiche and half the milk and stir roughly, to begin breaking everything up. Next, you have to blend it all together, so remove the pan from the heat. I use a hand blender and gradually work my way round the pan until it is all liquidised and smooth. You can also transfer it into a blender in batches and then back into the pan, but this takes a little bit longer.

Once you’re happy with the texture, return the soup to the heat, and stir in the rest of the milk until you get a thickness you are happy with. If you want a thinner soup, or want to make it go further, add more milk. Just keep tasting it to make sure you don’t dilute the flavour too much.

Tips

  • The butter and creme fraiche are both optional, but help to give the soup its rich taste
  • Leeks and cabbage can be substituted for the kale. Add the leeks after the onions, or the cabbage at the same time as the kale.
  • Skimmed, semi-skimmed or full fat milk can be used
  • Grate some cheese onto the soup when you serve it for extra richness

© Katheryn Rice 2007

h1

Celeriac Dauphinoise

November 9, 2007

What would you do with this?

celeriac.jpg

Mr Rice and I asked ourselves that very question when he lifted this harsh looking vegetable from our Able & Cole box last week. After double-checking that it was a celeriac, we pondered on how to make it look and taste better than it does here. Underneath it has some ancient-looking roots that look more like something from Pan’s Labyrinth than something you would be able to eat.

How will we get into it? Will we even be able to peel it? And how will we eat it? These are all questions we would have to answer ourselves, using our own ingenuity and a bit of reading. So, an hour or so later I had a plan: Celeriac Dauphinoise.

It’s normally made with potatoes, and purely with cream, but I love my cheese, and wanted to make it slightly less painful on the calories, so I have used a combination of double cream and low fat creme fraiche, with cheese added to each layer too. It was difficult to peel, and chopping the tangle of roots off the bottom felt wrong – like I was killing a Mangrove root. But needs must, so I got on with it.

The finished result is almost as far removed from the original object as it could be. It looks creamy, cheesy, appetising and manageable. But by far the best thing for me was the taste. The celeriac has an amazing combination of sweetness and sharpness, and a hint of the familiar celery taste. Whereas normal celery veers towards savoury preparations, celeriac gets sweeter when cooked, so combining it with the cream and cheese was a master stroke. The texture was also rather lovely, being a little bit al dente, but still managing to melt in the mouth. Mr Rice loved it too, so hopefully next time Abel & Cole send us one of these unfortunate looking chaps, we will be a little less afraid.

Recipe for Celeriac Dauphinoise
1 whole celeriac
200ml double cream
200ml low fat creme fraiche
200g mature cheddar cheese, grated

Peel the celeriac, starting from the top, and slice the roots away, making sure all rooty bits have gone. This might mean slicing sections off with a knift, rather than just a peelet. The outer is quite tough, so it’s best to get rid of it. Slice the celeriac into 5mm pieces.

Butter a medium sized oven-proof dish, and add a layer of celeriac slices, then a drizzle of cream and a sprinkling of cheese, then repeat with a dollop of creme fraiche and a sprinkling of cheese. Repeat this process until all ingredients are used up, and finish with a thin layer of cream and cheese. You can sprinkle each layer with a pinch of salt and pepper if you’re that way inclined, but I think the flavours are strong enough.

celeriac-dauphinoise-uncook.jpg

Cook at 190ºC for 1 hour, until the cheese is golden and the sauce is bubbling. If you have filled the dish quite full, make sure it’s on a baking tray to catch any overflow.

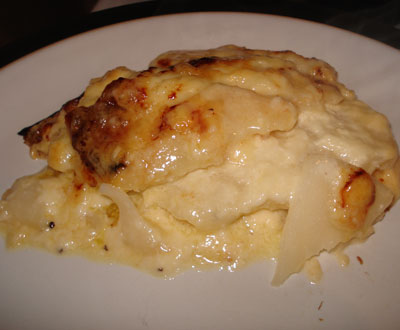
Celeriac Dauphinoise is a perfect, decadent side dish.

celeriac-dauphinoise.jpg

©Katheryn Rice 2007