Archive for the ‘eating’ Category

h1

Perfect flapjack

October 5, 2012

20121005-120813.jpg

Fabulous flapjack

Since the dawn of my baking career I have dreamt of and strived to make the perfect flapjack. My criteria:

Good
Chewy
Sticky
Toffee-y

Bad
Dry
Crumbly
Rock hard

In the past, I have always achieved a toffee flavour, but also at least one element of the bad list every time. I have experimented with different recipes, different methods and different cooking times.

It’s the rock hardness that’s frustrated me the most. For a reasonably experienced baker, this is simply not good enough.

I needed something quick and easy to bake at 9pm to take into work the next morning for the Macmillan World’s Biggest Coffee Morning (such a worthwhile charity, close to the Rice hearts for what they did for Mr Rice senior). I turned to Lorraine Pascale’s recipe. I’d used this one before, and the finished flapjacks had the most delectable toffee flavour, but once cooled, they were solid as a rock.

Since then I’d had a very useful chat with a serious flapjack maker, Barbara. She uses the same recipe, but with one crucial change, which I’ll come to in a bit.

It worked!

Remember to take your time. It’s a simple recipe, but it will be game over if you rush it.

Recipe for perfect flapjack

175g butter
175g golden syrup
175g soft dark brown sugar
Pinch of ground ginger
Pinch of salt
350g oats (normal or gluten free)

Preheat the oven to 150°C and line a 23cm x 23cm tin with foil-backed parchment (or normal parchment). Slowly melt the butter in a large pan, then add the syrup and melt together slowly, stirring all the time. Then add the sugar, and melt it slowly and completely, so the mixture is smooth. Continue to stir on the heat very gently for another 3 or four minutes. Don’t let it boil, whatever you do. Test a bit on a teaspoon, but cool it first, or you’ll do some serious damage to your mouth. The mixture should have a subtle toffee flavour. Now take it off the heat and add all the oats, salt and ground ginger, stirring until it’s all combined and all oats are covered nicely.

Press it into the tin and cook for 30 minutes. This is the crucial bit. LP says do it for 40, but this has always yielded flapjack bricks.

So, take 10 minutes off the cooking time and do them for 30 minutes only.

Remove from the oven and leave to cool for 10 minutes. Then use the parchment to lift them out of the tin and slice as big or small as you like.

© Katheryn Rice 2012

h1

Homemade Snickers bars

April 15, 2012

Honestly, these really are as good as they look. I had to hide them from Mr Rice. He found them in the end.

I first came across the recipe for these beauties on Pinterest and I couldn’t stop thinking about them. Just the thought of tucking into one got me planning the time to make them. Then I started going on about them at work, and everyone kept asking me when I was going to get on with it.

A beautiful, sunny spring afternoon. Both kids asleep. Time to get down to business…

Recipe for Homemade Snicker bars

Ok, this takes a little while, but there’s lots of rest time between each layer. Just give yourself a couple of hours. They are definitely worth the wait.

To prepare, line a 9 x 12 inch cake tin with foil-lined parchment. If you can’t get the foil-lined stuff, normal parchment will do.

Bottom chocolate layer
400g milk chocolate
3 tbsp smooth peanut butter

Homemade Snickers bars chocolate layer

Melt the chocolate, either using a Bain Marie or in the microwave, 30 seconds at a time so it doesn’t burn. Then stir in the peanut butter until it’s all completely melted and blended together. Pour this mixture into the tin and put it in the fridge to set completely. This should take about 30 minutes. While it’s setting, get all your ingredients ready for all the other layers. Then make the peanutty-nougat layer.

Peanutty-nougat layer
100g butter
150g caster sugar
1 tsp vanilla extract
200g marshmallows
4 tbsp evaporated milk
200g salted peanuts

First, crush the peanuts in a pestle and mortar or put them in a sealed plastic bag and bash them with a rolling pin, or chop them with a sharp knife. Do this as much or as little as you like, whether you want big peanut chunks or little bits.

Crush peanuts in pestle and mortar

Melt the butter and sugar gently in a pan until the sugar is dissolved, then add the evaporated milk and vanilla extract. When it’s all blended and smooth, take it off the heat and stir in the marshmallows until they’re completely melted.

Melt marshmallows into nougat

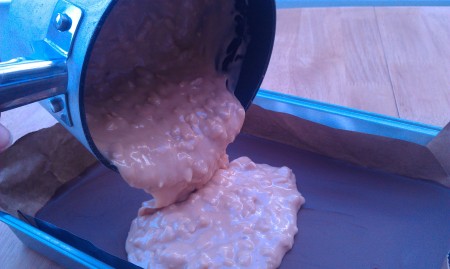
Finally, stir in the peanuts. Leave it to cool for five minutes and them pour it over the chocolate layer. Make sure you spread it out as quickly as you can, so it doesn’t start to melt the chocolate layer underneath. Put it back into the fridge for another half hour. You can chill for 20 minutes too.

Add peanutty-nougat layer

Caramel layer
2 bags of hard toffees
4 tbsp evaporated milk

Melt toffees with milk

In a cold, unheated pan, gently melt all the toffees with the milk and stir constantly until it’s all smooth. Once it’s melted you need to add it straight to the tin, so don’t start making it until the peanut layer’s set.  When you add it to the tin, spread it out as quickly and carefully as you can, so the layers don’t melt into each other. Leave this to set for 30 minutes.

Top chocolate layer
400g milk chocolate
3 tbsp smooth peanut butter

Just the same as the bottom layer. Melt the chocolate, either using a Bain Marie or in the microwave, 30 seconds at a time so it doesn’t burn. Then stir in the peanut butter until it’s all completely melted and blended together. Pour this mixture into the tin and put it in the fridge to set completely.

Done!

Leave it to set fully for at least an hour.

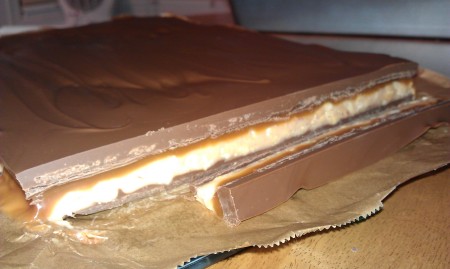
Then you’ll have a pretty impressive –looking slab like this:

Slab of homemade Snickers bars

It’s really rich and sweet. So cut small pieces! Get a long sharp knife and cut across the whole slab. The more you chop it from above, the more likely it is to get squashed, making everything squidge out. So turn the long slice on its side and chop it into individual pieces. Put your Snickers bars straight back into the fridge once you’ve cut them, as they start getting soft and melty pretty quickly. If you’re a real chocolate-lover, then you’ll want your chocolate soft and room-temperature, so get them out of the fridge at least half an hour before you’re planning to eat them.

Then see how long it really is until you start tucking in…

© Katheryn Rice 2012

h1

Lemon tart

August 8, 2010

Lemon tart is one of my favourite desserts, but for some reason, one that I’ve never made myself. Why, when it’s so simple? Well, now I have made it, and it was delicious. And easy. Well, I used ready made pastry, sorry.
image

This was supposed to be low calorie, using low fat creme fraiche, but Mr Rice had trouble locating it on his shopping trip. So there were a few more calories than I’d originally intended. The full fat creme fraiche made it lovely and rich though.

Recipe for Lemon tart

250g sweet dessert pastry (Sainsbury’s is sweet and buttery)
200g creme fraiche
2 eggs
4 egg yolks
175g caster sugar
2 lemons, juice only
icing sugar for dusting
raspberries for decorating

Preheat the oven to 190°C and grease a 9 inch loose bottomed tart tin. Roll out the pastry and carefully drape it over your tin, and press it down into the tin, but don’t cut the edges off at this point. Prick the surface gently with a fork, fill with baking beans (or baking paper and rice) then chill it in the fridge for at least 20 minutes, or until you need it.

Bake the pastry blind for 15 minutes until it’s just getting a bit of colour, then remove the baking beans or paper and rice. Brush the pastry with the beaten egg yolk, and bake for another 10 minutes until the pastry’s golden. Let it cool for a bit. Now you can trim the edges as you like.

Turn the oven down to 110°C. Whisk up the eggs, egg yolks and sugar, then stir in the creme fraiche, and finally the lemon juice. Transfer it into a jug so it’s easy to get into the tin.

Put the tin onto the oven shelf and pull it so you’ve got enough pouring room, then pour your mixture slowly into the tin, slide it back into the oven and cook for 1 hour 10 minutes. Check the centre is a little wobbly, and it’s ready.

Leave to cool, dust with icing sugar, scatter with a few fresh raspberries and serve. For extra decadence, drizzle with some single cream. Yum.

© Katheryn Rice 2010

h1

Cheesy sweet potato cakes

July 18, 2010

image

Perfect for light Sunday lunch, and a great way to use up last night’s sweet potato mash.

h1

Making Whoopie Pies

June 9, 2010

As food trends go, this is one I wasn’t sure about at first, particularly because of the cheesy name – American of course! According to most sources, they originated in the Amish communities in the US. They would be added to lunchboxes as a treat, and the lucky recipient would shout out, ‘Whoopie!’ if they found one packed up for them at lunchtime.

Whoopie Pies

I have to admit, the Whoopie Pies you see here were my third attempt. The first attempt, I inexplicably used bicarbonate of soda instead of baking powder, and poor quality marshmallows. The result was quite crunchy, biscuity with a jelly-like filling. My lovely colleagues were generous and complimentary.

The second attempt went much better, but took me a long time, and got eaten before I managed to take any snaps! That time though, I did get to perfect the piping and the flavours.

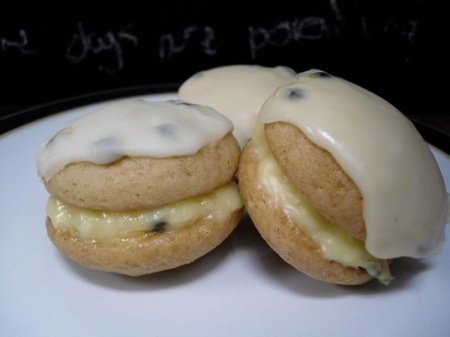
So, attempt three: Passion fruit filling and icing and light, spongy pies, hooray!

My advice is, these will make a big impression, but make sure you have a good few hours to make them, as they have several stages. Just one more thing, those who like to think they set trends may say they are the new cupcakes, but unlike cupcakes, they are not so quick and easy to make.

This recipe is an adaptation of one from the king of baking, Mr Dan Lepard.

Recipe for Passionfruit Whoopie Pies

For the pies
75g unsalted butter
1 egg
150g caster sugar
125g soured cream
25ml cold milk
1 teaspoon vanilla extract
¾ tsp bicarbonate of soda
275g plain flour

For the filling
50ml milk
100g white marshmallows
125g very soft unsalted butter
Pulp from two passion fruit

For the icing
Pulp from two passion fruit
200g icing sugar

Line a few baking trays with greaseproof paper and get your piping nozzles at the ready. Preheat the oven to 180ºC.

Melt the butter in a bowl, then put it to one side. Then whisk the egg with an electric hand mixer until it’s light and fluffy, then add the sugar a third at a time and whisk it up until it’s thick and glossy. Add the cold milk to the egg, plus the soured cream and vanilla and stir to combine, then beat this into the egg and sugar bit by bit. Then sieve the flour and bicarbonate of soda into the mixture and gently mix until it’s smooth.

Get your piping nozzle out and spoon about a third of the mixture into the piping bag. Then pipe small balls, about 3cm apart onto your trays.

Whoopie Pies

It’s important to leave this space as they will grow while they’re cooking, and if they are too close, they’ll end up with flat edges, which spoils the effect.

Whoopie Pies

Cook the pies for about 12-14 minutes, until they’re just turning golden, but not too dark or they’ll be a bit too hard. Cool them on a cooling rack.

Whoopie Pies

And then put them into pairs.

Whoopie Pies

For the marshmallow cream, heat the milk in a pan on a low heat, then add the marshmallows and stir continuously until they’re melted and the mixture is smooth. Then transfer to a bowl to cool. Beat the soft butter until it’s creamy and soft, then gradually mix it with the marshmallow mixture until it’s all smooth. Finally, stir in the passionfruit pulp and then put the marshmallow cream in the fridge to set.

To make the icing, mix 200g of icing sugar with the rest of the passionfruit pulp and put in the fridge to set.

Ok, now to make the pies. Make sure the cream isn’t to runny, or it will just squidge out of the sides. Sandwich the pies together and put them in the fridge to set. After about half an hour, get them out of the fridge and top them with the icing, then finally back into the fridge one more time to set.

Yes, that really is the last stage. Finally, they are ready… get them out of the fridge and keep them at room temperature to serve.

Whoopie Pies

© Katheryn Rice 2010

Add to DeliciousAdd to DiggAdd to FaceBookAdd to Google BookmarkAdd to MySpaceAdd to NewsvineAdd to RedditAdd to StumbleUponAdd to TechnoratiAdd to Twitter

h1

Eccles Cakes

March 4, 2010

Mr Rice’s family hails from sunny Manchester, so I really should have made Eccles Cakes for him before now. I think it helped him remember his Northern roots, if nothing else.

I never used to like Eccles Cakes when I was a child. The thought of all those currants in stodgy, cold puff pastry was not a pleasant one. But those miserable, dry old husks were a million miles from these fresh, home made delights. These Eccles Cakes have crisp, sugary pastry encasing a sweet and delicious filling of moist currants with an irresistible crunch, courtesy of the demerara sugar in the mix.

Even Mr Rice confessed that when I told him I’d made him some Eccles Cakes, he was dreading having to taste them, but he was relieved to say he loved them (well, that’s what he told me). They are best served warm from the oven, and if you fancy adding a blob of vanilla ice cream, go for it.

Just a word of warning though, they do take a little while to put together, so make sure you’ve got time. And also remember, it’s important to carefully seal the bottoms, or the lovely juices and filling will leak out, thus spoiling the effect. Bite into one, crunch the pastry and then revel in the sweet, juicy filling. Yum.

Recipe for Eccles Cakes
75g butter
150g soft brown sugar
175g currants
pinch of ground cinnamon
zest of ½ an orange
275g puff pastry
75ml milk

Melt the butter, then mix it with the sugar, currants, cinnamon and orange zest together in a bowl. Then roll out the pastry on a floured surface and use a cookie cutter to make rounds about 10cm wide.

Then this is the fiddly bit. Get your milk to glaze, a pastry brush and a non-stick baking tray ready. Take a pastry round in the palm of your hand and curl your hand up a little so you make a dip in the pastry. Then dollop a heaped teaspoon of the currant mixture to the middle of the pastry and fold all the edges to the centre. Now add the milk – which you need to seal the pastry together – and press down until you think it’s sealed.

Carefully place the Eccles Cake, sealed side down onto the baking tray, brush with milk, sprinkle with sugar and then make a little cross in the top with a sharp knife. You need the cross in the top to let the steam out during cooking, which helps prevent the bottom coming open.

Bake the Eccles Cakes in the oven at 190°C for 12 – 15 minutes, until the pastry is golden. Cool on a wire rack for about five minutes, then serve with vanilla ice cream.

© Katheryn Rice 2010

Add to DeliciousAdd to DiggAdd to FaceBookAdd to Google BookmarkAdd to RedditAdd to StumbleUponAdd to TechnoratiAdd to Twitter

h1

Birthday cupcakes

December 7, 2009

Little Ricicle is one year old. It’s amazing how quickly a year has passed, but it also seems like a very, very long time since it was just me and Mr Rice. We wouldn’t have it any other way of course.

I suppose most parents go overboard when it comes to first birthday parties, and we were the same. It fell to me to make the cake, and my celebration cake of choice at the moment is the cupcake, so that’s the way I went.

I’ve posted this recipe before. It’s tried and tested, so why change it?

Recipe for Vanilla Cupcakes
125g unsalted butter (room temperature)
125g caster sugar
2 eggs
100g self raising flour
25g plain flour
3 tbsps skimmed milk
1 tsp vanilla extract

Butter cream
150g unsalted butter (room temperature)
300g caster sugar

Preheat the oven to 200ºC and put 16 bun cases into a muffin or bun tin. Then beat the butter, sugar, eggs and vanilla in a food mixer until well combined, followed by the sifted flour and beat again until it’s all smooth. Then add the milk 1 tbsp at a time, with the mixer on, until the mixture is soft but not runny.

Get two teaspoons and get a heaped spoonful of the mixture on one, and carefully push it off the spoon and into the bun cases with the other until all the bun cases are equally filled. Make sure they are no more than half full or they will overflow when they cook.

Cook the cupcakes for 15-18 minutes until the tops are golden brown and then let them cool fully on a wire cooling tray before you ice them.

To make the butter cream, just beat together the butter and the icing sugar until nice and smooth. Then you can smooth it or pipe it onto the cupcakes however you like, and of course you can add a little colour and other accoutrements too to give them the perfect finish!

For more information, here’s the original post, Just cupcakes.

© Katheryn Rice 2010

h1

Four-seed banana bread

November 6, 2009

As the chill takes hold and we’re all starting to go into hibernation mode, I thought this would be a good time to make something comfy and warm to snuggle up with on the sofa – lovely, lovely banana bread.

Four seed banana bread

Four seed banana bread

There are many recipes floating around for banana bread, and I’ve tried a lot of permutations, but this is by far the best. Because bananas are naturally sweet, there are some recipes without sugar – they are ok but not amazing. I say, in for a penny, in for a pound; get some sugar in there and make it not just ok, but damn good! As well as enhancing the bananas’ sweetness, the brown sugar gives the freshly baked loaf a light, almost crunchy crust. Slice carefully through the warm loaf and you get the moist, sweet bread that’s ready to eat.

Yes, I do add seeds to a lot of my recipes, but I reckon if you can get away with it, do it. They add goodness and protein and give you licence to eat cake with impunity…

Recipe for four-seed banana bread

200g self raising flour
50g wholemeal self raising flour
1 tsp baking powder
pinch of salt
150g soft light brown sugar
100g butter
75g raisins
1 tbsp linseeds
1 tbsp poppy seeds
1 tbsp pumpkin seeds
1 tbsp sunflower seeds
2 eggs
1 tsp vanilla bean paste (or vanilla extract)
4 bananas, mashed (fresh or frozen)

Get a large bowl and add the sifted flours, baking powder and salt, then mix in the butter and sugar, either rub it in with your fingertips, or – much easier – mix it all up in the food mixer. Whisk up the eggs, bananas and vanilla with a food mixer or by hand, and carefully fold into the flour mixture, finally adding the raisins and seeds.

Pour the mixture into a large silicone loaf tin, or a greased and lined metal tin, and cook at 175°C for  1 hour. Do the skewer test after and hour; it should be golden on top when it’s ready and a little moist inside, but if the skewer’s too sticky, turn the oven down to 170°C and give it five more minutes.

Tip: I usually make a large loaf and a little one too, in a small loaf tin. This is a really good gift for someone, or an alternative to the bog standard wine if you’re invited round for dinner etc.

© Katheryn Rice 2009

h1

Mr Rice makes meatballs (Thai style)

August 17, 2009

Mr Rice likes to get his recipes from his head, but he spotted this one and thought he’d take the plunge. As he started to put his masterpiece together, he reminded me that he doesn’t like being ‘bossed about’. I was a little taken aback as I was keeping well out of the way in order to avoid any accusations like that. When I protested my innocence he explained that he was talking about the recipe itself – apparently he doesn’t like following instructions from anyone, not just me. The upshot is, this is his version of a recipe from the August edition of Delicious magazine.


Thai Pork Meatballs with coconut curry

Thai Pork Meatballs with coconut curry


Recipe for Thai Pork Meatballs with coconut curry

1kg pork mince
fresh ginger, grated
2 lemongrass stalks, chopped
Handful of fresh coriander, chopped
1 red chilli, chopped
Juice and zest of 1 lime
3cm fresh ginger, grated
5 spring onions, chopped
1 egg 

Coconut curry
4 tbsp Thai red curry paste
2 tins reduced fat coconut milk
5 spring onions
2 red peppers, thinly sliced 
1 sweet potato, peeled and chopped into batons
Handful of green beans
2 lemongrass stalks, chopped
Juice of 2 limes
200g ground almonds 

Egg noodles to serve

Mix all the meatball ingredients together in a large bowl – mixing with your hands gets everything properly combined, so prepare to get your hands dirty and sticky. Then form them into small golfball-sized meatballs, then put them in the fridge to firm up, for a minimum of 20 minutes.

Fry the meatballs in a large frying pan with a little splash of olive oil until they are brown all over, then remove them from the pan and add the red peppers, sweet potatoes and green beans and stir-fry them for 5 minutes until they are nice and soft. Put the noodles on in a separate pan, then stir in the curry paste and cook for a couple of minutes, followed by the coconut milk, chillies, spring onions, lemongrass and lime juice and cook for a few minutes. Finally, add the ground almonds and cook for 5 more minutes.

Add the meatballs into the mix and cook for five more minutes to make sure they’re lovely and hot.

Drain and serve the noodles, then spoon the curry on top, making sure everyone gets their fair share of meatballs.

© Katheryn Rice 2009

h1

Banana and blueberry crumble

October 18, 2008

When I make crumble I tend to make extra topping and freeze it away for when Mr Rice and I fancy a quick pudding fix. One Sunday we were feeling particularly sweet-toothed and could think of nothing better than a lovely crumble. So I dug out the frozen crumble mix and had a look around at the fruit available. 

Ok, so all we had were some frozen blueberries and some nicely ripe bananas. I think cooked banana is delicious and under-rated, so I thought I’d give it a go, combined with some low-GL antioxidant-rich blueberries for a little extra colour and flavour.


Banana and blueberry crumble

Banana and blueberry crumble


It worked fantastically well, the bananas took on that softer, creamier texture and a subtle, deep flavour, which means there’s no need for butter with the fruit. The blueberries added sweet little kick. The great thing about this pudding is that it’s so easy and tastes amazing…

Recipe for banana and blueberry crumble
300g blueberries (fresh or frozen)
3 bananas, ripe is best
100g golden caster sugar
Crumble
100g wholemeal plain flour
80g oats
50g golden caster sugar
50g demerera sugar
100g butter, chilled

Throw the blueberries into a 7-9 inch pie dish, then slice the bananas into the mix, add the sugar and combine well. Level out the mixture in preparation for the crumble.

To make the crumble, grind the oats until quite fine, but still with a bit of texture, then add them and the sieved flour into a large bowl. Then chop the butter into the mixture into inch-size pieces. Rub in the butter until the mixture looks like breadcrumbs and then add both sugars. Rub the sugar in until it is completely blended.

Pour the crumble onto the fruit mixture and then cook at 180 degrees for 20-25 minutes or until the mixture is bubbling and the crumble is golden brown. Serve with fresh custard.

© Katheryn Rice 2008